Page Contents
Want to know how to upload digital art on Instagram? Read this article, and we will show you how to showcase your digital art in the best possible way.
As it has the highest engagement rate among all the social media, Instagram is pretty much like a paradise for any business, especially for artists who can display and even sell their artworks on the platform. Actually, Vogue named Instagram “the world’s biggest art marketplace.” So, why not share your talent on this promising platform?
How to upload high-quality digital art to Instagram?
We all know that for digital artists in this ever-changing virtual world, the most important thing is to show the best version of their work to their followers and customers; otherwise, they quickly get neglected. No one likes to see a pixelated or wrongly cropped image. If you don’t want to be among these clumsy artists, follow the next steps to post your digital art on Instagram in the best way.
Step 1: Prepare the best version of your digital artwork
Before uploading digital art on Instagram, you want to make sure that your content is in its best shape. To make it easy for you, we’ve created a checklist. Have a look at it and see if you’ve done all these necessary checks. This process might take you some extra time, but the result is worth it.
Instagram resolutions and ratio
As a digital artist, you want to present your work in the highest quality. Your work can be anything from 2D or 3D computer graphics to photo painting, data-moshing, and even pixel art (as funny as it seems)! Also, you may want to upload a photo or a video that shows the process of making that piece. In any case, you want to make sure you upload the digital arts in the highest resolution. Here are the latest Instagram resolutions in 2020:
Images
The ultimate supported image resolution for use on Instagram is up to the width of 1080 pixels. Back then, Instagrammers could only update square pictures in a 1:1 ratio. But now, it is possible to publish landscape and portrait images as well.
If you share a photo that has a width range of 320 to 1018 pixels, Instagram will keep it in its original resolution as long as its ratio stays between 1.91:1 and 4:5. To reach this ratio, your image height must be something between 566 and 1350 (with a maximum width of 1080 pixels). In larger cases, Instagram crops your original image, which can make your work seem malformed. Things get worse if your image has a smaller width of 320 pixels: Instagram will automatically enlarge it to fit its supported resolution. Why is it bad? Because enlarging a photo can severely damage its quality.
Tip: Always stay with a 1:1 square ratio with 1080 in 1080 pixels. Even if you have a portrait or landscape image, make it square by adding a white (or any color that matches) frame around it. This way, you not only publish the art in the highest possible quality but also when someone visits your feed, all the photos are shown correctly and in the same theme.
Videos
For square videos, the aspect ratio is 1:1 and 1080 by 1018 pixels for the duration between 2 and 60 seconds. Also, for horizontal videos, the ratio must be between 1.91:1 and 16:9, and 1080 by 607 pixels.
Stories
You should keep a ratio of 9.16 and a resolution of 1080 by 1920 pixels.

IGTV
The acceptable ratio for vertical video is the maximum of 9:16 and a minimum of 4:5, and a resolution of 1080 by 1920 pixels. If your video is horizontal, a maximum of 16:9 and a minimum of 5:4, 1920 by 1080 pixels will do the trick.
What dpi to upload digital art to Instagram?
Each dpi is equal to one pixel. For example, 300 dpi means 300 pixels. So, you can use the same figures, as mentioned in the “Instagram resolution and ratio” section, when working with the dpi scale.
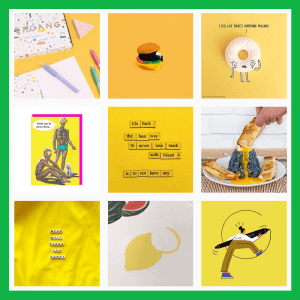
Use multiple photos
You can show your work from different angles or cut one single work into multiple pieces as a carousel. This method is a great way to show the details more closely. Also, it is a good idea to add related images in the next slides. For example, if you used a real photo to create a digital painting, it is a good idea to upload the original photo for comparison.
Use behind the scene photos and videos
Having a colorful feed full of artistic works seems excellent. But it might be a good idea to add some real content other than digital artworks. For example, you can share some behind the scene video or photos (like how you prepare your devices). Also, you can celebrate your page or life milestones like birthdays with your followers by sharing real images.
Sharing real photos is especially a good idea as some users complained that Instagram occasionally bans the accounts that share “unreal images.” By sharing different types of photos once in a while, not only you save your accounts from being banned, but also you prevent your feed from being repetitive.
Grids
Many artists use six or nine grids to upload one piece of work to catch the visitors’ eyes. Just remember that you need to upload all the photos at the same time or in a short time to prevent causing any disturbance for your followers.
Step 2: Mistakes to avoid before uploading digital art on Instagram
Here’s the second step of posting digital art on Instagram. Along with all the things that you should DO, there are some DON’Ts as well. Check this list to avoid making any mistakes, and see properly upload digital work to Instagram.
Partial photos
Don’t crop your work intentionally. People don’t like to see works that seem to be incomplete. Just show the whole thing.
Glare
If you printed and framed your work and now you want to take a photo of it, make sure you have an eye for any glass reflection and lighting.
Instagram filters
Although Instagram filters have a significant effect on the number of likes, when publishing a digital work, it is best to avoid any filter. You must show your work as original as it is.
Watermarks
Don’t use big ugly watermarks to say this work is yours! You can simply add your signature in the corner of the photo in a small size. Big watermarks will distract visitors. So, don’t use them!
Step3: Upload your digital arts to Instagram
Finally, now that your piece of art is ready, it’s time to publish it! As you can see, cropping and resizing the photos in a suitable size and adjusting other settings are much more comfortable using the desktop. Now that your content is 100% ready let’s see how to upload digital arts to Instagram in the best way.
Use AiSchedul
Crafting the best content is one thing; uploading it right is another thing. One of the best Instagram tools that can help you to get the best result is AiSchedul. This AI-powered cutting-edge Instagram manager offers a wide range of features. Let’s go over some of them to see how they can help you as a digital artist.

Scheduler
As the name indicates, the main feature of AiSchedul is scheduling feed posts and stories. One of the essential things that you need as a successful artist in this fast-paced world is consistency. You need to show your work to your fans regularly. Well, that is a little bit too much to ask from an artist. Who has the time to write a caption, upload photos, and share them five times a week, right?
Well, with AiSchedul, you don’t have to be worried about it at all! This smart scheduler can help you to plan your posts for days and even weeks ahead. By continually exposing your artworks to the fans at the right times, you increase the chance of getting the higher engagement that can also lead to being noticed on Instagram on a broader scale.
How to work with AiSchedul
To use this useful tool and see how to upload digital art to Instagram, simply sign up for AiSchedul, add your Instagram account(s), and go to “Manage Account.” From here, you can choose “SCHEDULER” and upload your content on feed or story.

As you can see, it’s super easy to add your content using smart tools. If you didn’t already resize your post (we highly recommend you to do it), the app automatically fits your image to the Instagram-supported dimensions.
Then write a killing caption, explaining all the essential notes about your artwork. If you sell arts on Instagram, make sure you add a price and if you have a website or an Etsy Shop linked to Instagram, make sure you mention it in the caption and link your post to your shop (how can you link each post to an external link? Make sure you read the next part!).
After that, add relevant hashtags for art and artists and then set a date for publishing. Make your post even more visible by clicking on “Post on stories as well.”
Want to watch a walkthrough video of uploading posts on AiSchedul? Have a look:
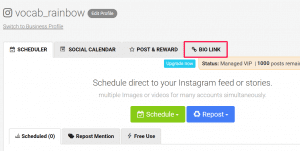
AiSchedul bio link
You’re going to love this feature of AiSchedul. As mentioned before, you can link your Instagram bio and even individual posts to external links. To use this unique feature, go to “BIO LINK” and scroll down to see your latest feed posts. Click on the photo that you want and add any URL that you want. It can be your website address, a link to your Etsy shop, YouTube channel, Pinterest page, Twitter, or any other social media. Moreover, you can even add these links to your Instagram bio.
Social calendar
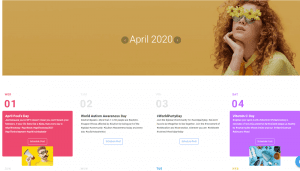
An artist needs to stay up-to-date and know all about social events. It is a good idea to create an artwork related to that event. For example, if you paint digital graphics, you can prepare a special one for Christmas! Luckily, with Social Calendar offered by AiSchedul, you can see upcoming events and even get some inspiration by viewing the related hashtags to that event.
Post and reward
Giveaways and contests are great ways of attracting new followers. As an artist, you have this excellent opportunity to use AiSchedul posts and reward features. Every once in a while, you can throw a contest and choose one of your works as a reward. With AiSchedul, it is easier than ever! Just go to your dashboard, and on the “POST & REWARD” tab, click on “Schedule to Reward.”
In this part, which is similar to the scheduling post section, you can add the rules of your contest. For example, to set the rule “Tag 3 people to win the prize,” simply add 3 to the tag box. The same goes for other parts, such as hashtags. When you finish setting rules, you can scroll down, and you will see that AiSchedul already generates the rules as a caption. The only thing you should do is to edit the caption, add a link if you wish, and then set a date to publish the promotional post.
Conclusion
Instagram is the best social media for artists to showcase their work to the world. Surely, knowing how to upload digital art to Instagram is one of the key points to be a winner. Make your job easier and get famous fast on this platform using smart tools such as AiSchedul.