Page Contents
“A picture is worth a thousand words,” they say. As a visual-based social media, Instagram is undoubtedly the best photo-sharing app over the globe. The main feature of Instagram – scrolling content and hit like – allows followers to check a lot of photos fast. Sometimes, without even paying much attention to the captions.
You can guarantee your post’s success among thousands of other photos by paying attention to the quality. No one can resist liking a high quality super cool photo! And that’s maybe it’s much easier for photographers to get more followers on Instagram.
In this article, I’m going to show how to upload high-quality photos on Instagram in three simple steps. Whether you want to share your personal pictures or upload digital art on Instagram. Let’s see these steps in a glance:
Before we get to the steps in more detail, let’s first examine one of the most common problems you encounter while uploading a photo on Instagram.
Why Do Photos Lose Quality after Uploading on Instagram?
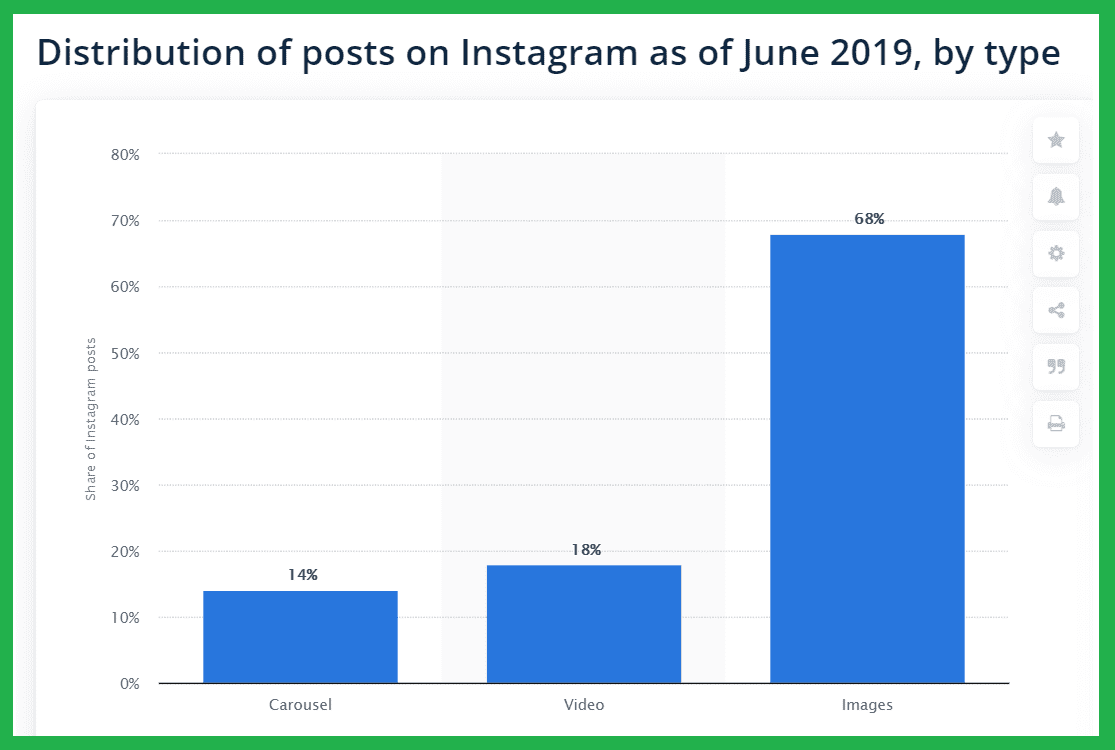
Each day, Instagrammers upload about 95 million photos on the platform. Pretty mind-blowing, right? Also, among three types of posts that you can share on your Instagram feed, the photo is the dominant type by making up 68% of all posts.
Now imagine everybody could upload their media to the highest quality possible on Instagram. Well, in that case, Instagram would turn into a real mess. First of all, the Instagram database couldn’t bear such burdens; second, users couldn’t easily use it!
So, to protect its database and provide a satisfactory experience for all users, Instagram compresses photos and videos above the defined dimensions. Also, if the content is below the standards, Instagram will enlarge the photo or video to match the minimum requirements.
That’s why you see some of the photos lose their quality after uploading on Instagram. How can your photo be in the best shape and size to be uploaded on Instagram? That’s easy! Read the following section to find out about these three simple steps!
Related Article: How to Delete One Picture Out of Multiple on Instagram?
How to Upload High-quality Photos on Instagram?
Knowing how to upload high-quality photos on Instagram is essential for the success of your Instagram page. So, let’s dive in!
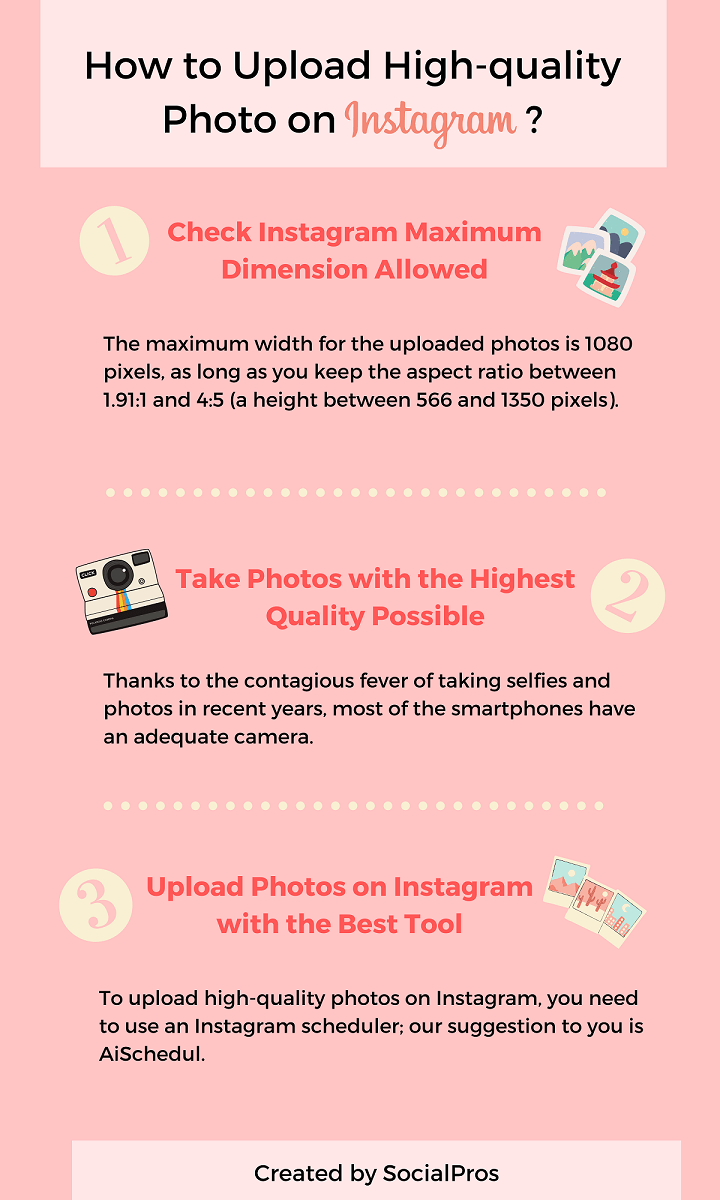
Step #1: Check Instagram Maximum Dimension Allowed
For now, and with the latest Instagram app installed on your phone, the maximum width for the uploaded photos is 1080 pixels, as long as you keep the aspect ratio between 1.91:1 and 4:5 (a height between 566 and 1350 pixels). As mentioned before, if you share a photo with higher dimensions, Instagram will automatically crop it. In summary, your photo will face one of these options after uploading:
- No processing: If your photos have a width between 320 and 1080 pixels and a height between 566 and 1350 pixels, which gives an aspect ratio between 1.91:1 and 4:5.
- Upscaling: If you share a photo at a deficient quality, which means it has fewer than 320 pixels width, Instagram will enlarge it to a width of 320 pixels.
- Downscaling: Photos with a higher resolution than 1080 horizontal pixels or 1350 vertical pixels will be decreased in size by Instagram to meet a width of 1080 pixels.
- Cropping: If your upload has an unsupported aspect ratio, Instagram will crop the image the best it can to fit a supported ratio (between 1.91:1 and 4:5).
But knowing the maximum allowed size on Instagram is not the only way that ensures the quality of your photos on Instagram. A more important part of the work depends on the quality of your original photo.
Step #2: Take Photos with the Highest Quality Possible
Sure, shooting with a professional DSLR camera makes mark changes in the result, but not anyone has a Canon camera, which is totally fine. Thanks to the contagious fever of taking selfies and photos in recent years, most of the smartphones have an adequate camera.
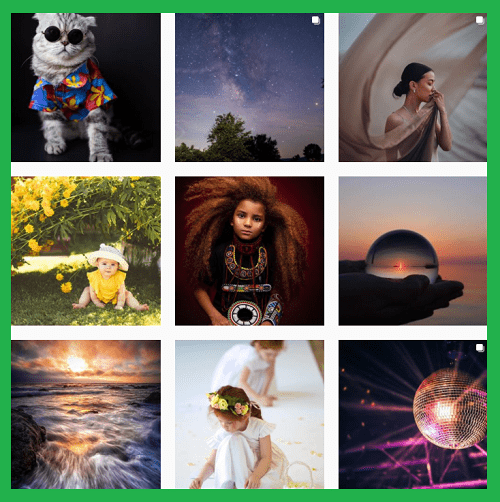
Actually, in some cases, they can even surprise you. Not to mention that some people use their phones to make theatre movies! Just take a look at these posts to see the power of the smartphone’s camera:
When you shoot your photo, edit it, and then resize it to one of the accepted ratios mentioned in step one. If you use your phone, you can download some resizing apps from the App Store or Google Play. If you have your photo on the laptop, Adobe Lightroom or Adobe Photoshop are your best friends.
Tip: Try to keep the ratio as 1:1. This is the original Instagram ratio, and your feed will look much neater when all of your photos are square.
And remember this: the higher the quality of your original photo, the better your pictures after resizing! So, always adjust your camera setting on the highest quality possible.
Now that you have your photos nice and ready, time to upload them on Instagram!
Related Article: How to Upload Video to Instagram from PC: Safe and Free
Step #3: Upload Photos on Instagram with the Best Tool
Although it might seem the most straightforward part of the process, many Instagrammers make mistakes in this stage! They just use some apps or messengers to transfer media to their phones to upload photos from there.
First of all, it’s possible to upload photos to Instagram from the PC, and it is super easy. I’m going to show you the best way of uploading your photos to Instagram from a computer in the following. But if you insist on transferring your pictures to your phone, make sure you use Google Drive or Dropbox to prevent losing photo quality.

AiSchedul: The best way to upload high-quality photos on Instagram
To upload high-quality photos on Instagram from a PC, laptop, or even your phone, you need to use an Instagram scheduler; our suggestion is AiSchedul.

AiSchedul has a powerful scheduler that enables you to publish Instagram posts from the web. It also has some additional features such as BIO LINK, which let you put unlimited external links on your bio and even your posts. To use these tools, first, you need to sign up for AiSchedul.
After adding your Instagram accounts, click on “Manage Account” and go to the “SCHEDULER” tap. As you can see, you have two options: Schedule a feed/story or Repost. Click on Schedule and choose feed or story. Then simply drag and drop your photo to the page, so it appears on the screen.
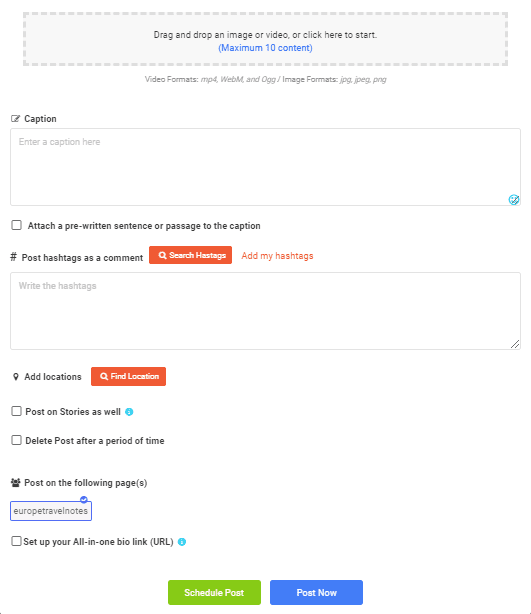
Then write a great caption, search and choose suitable hashtags (you can even add multiple hashtags using AiSchedul), add external links if you wish, and then set a publishing date. And it’s done, as simple as that!
Some Tips Before Uploading a Photo on Instagram
If you don’t use your original work and want to repost a photo on Instagram, whether it’s viral photos and trending content or a photo related to your page, make sure that you give photo credit on your post properly.
And remember. If you already filled your page with low-quality photos, you can always mass delete your Instagram posts and start fresh!
Final words
Building an eye-catching feed is one of the best actions that you can take to gain more followers. Photos are one of the first things that come to Instagrammers’ eyes. By publishing high-quality photos, you can increase your chance of being different on Instagram.