Page Contents
If you’re looking to keep your tweets out of the public eye, learning how to make Twitter account private is a smart move.
People may want to make their Twitter accounts private for several reasons. Firstly, it allows them to control who can see their tweets and keep their private information out of the public eye. This can help prevent unwanted followers and protect against harassment or abuse.
Secondly, making a Twitter account private is a personal choice that can be beneficial for professional and personal reasons. For instance, people who use Twitter for marketing may want to limit the visibility of their personal tweets to appear more professional. Overall, making your Twitter account private is a way to exercise more control over who can access your tweets and maintain your privacy and security online.
In this comprehensive guide on how to Make Twitter Account Private, we’ll walk you through the process step-by-step, provide tips for keeping your account secure, and discuss how to manage your Twitter followings.
How to Make Twitter Account Private on Desktop
Making your Twitter account private is a relatively simple process. Here are the steps to follow:
- Log in to your Twitter account on a desktop.
- Click on your profile picture in the top-right corner of the screen and select ‘Settings and privacy.’

3. Click on the protected Tweets option and checkmark the box for ‘protect your tweets’.
4. Click ‘Save changes’ to apply the new setting.
Now your Twitter account is private, and only approved followers can see your tweets.
How to Approve or Deny Follower Requests on Twitter
When someone wants to follow you on Twitter, you’ll receive a notification. Here’s how to approve or deny follower requests on the platform:
- Open the notification that says ‘username wants to follow you.’
- Click on the ‘Approve’ or ‘Deny’ button.
If you approve the request, the user can now see your protected tweets.
How to Make Your Twitter Account Private from the iPhone or iPad App
Learning how to make your Twitter account private on your iPhone or iPad is a simple process that can be completed in just a few steps. Here’s how to do it:
- Open the Twitter app on your iPhone or iPad.
- Tap on your profile icon in the top left corner of the screen.
- Select ‘Settings and privacy’ from the drop-down menu.
- Tap on ‘Privacy and safety’ from the list of options.
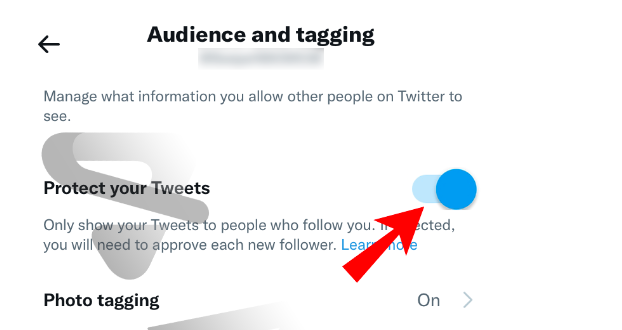
- Scroll down to the ‘Tweet privacy’ section and toggle the switch next to ‘Protect your Tweets’ to the “on” position.
- You will see a prompt asking you to confirm that you want to protect your Tweets. Tap on “Protect” to confirm.

Once you have completed these steps, your Twitter account will be set to private, and only the people you approve will be able to see your Tweets.
How to Make Twitter Account Private on Android App
If you’re using an Android device and want to know how to make your Twitter account private, don’t worry – it’s just as easy as it is on an iPhone or iPad. Here’s how you can protect your tweets and keep them hidden from anyone you don’t want to see them:
- Open the Twitter app on your Android device.
- Tap the gear icon on the top right corner of your screen to access your account settings.
- Tap “Privacy and safety” from the drop-down menu.
- Look for the “Protect your Tweets” option and turn on the slider to activate it. When it turns green, you’ll know that your tweets are now protected.
- Tap “Done” and enter your Twitter password to confirm the changes.
How to Get Your Twitter Account Back to Public
If you want to make your Twitter account public again, follow these steps:
- Log in to your Twitter account and go to the ‘Settings and privacy’ page.
- Find the “Tweet privacy” option and uncheck the box that says ‘Protect your Tweets.’
- Click ‘Save changes’ to apply the new setting.
Boost Your Knowledge on Twitter: Explained: Who Unfollowed Me on Twitter
Tips for Keeping Your Twitter Account Safe & Secure
Even with a private Twitter account, keeping your account secure is essential. Here are some tips:
- Use a strong and unique password for your Twitter account.
- Enable two-factor authentication to add an extra layer of security.
- Be cautious about clicking on links or downloading files from unknown sources.
- Regularly review your approved followers’ list and remove any accounts you don’t recognize.
- Avoid tweeting sensitive information, such as your address or phone number.
By following these tips, you can ensure that your Twitter account stays safe and secure.
FAQs on How to Make Twitter Account Private
We’ve gathered the answers to more questions you may have about making your Twitter account private. Read on to discover the tips and tricks that will help you keep your tweets secure and your online identity protected.
1. What Is the Difference between Public and Protected Tweets?
Public tweets are the default setting for all Twitter accounts. Public tweets can be retweeted, liked, and replied to by anyone. They can also be indexed by search engines, which means they can show up in search results. Public tweets can help you build your brand and grow your audience, as they allow you to reach a wider audience.
On the other hand, protected tweets are only visible to your Twitter followers. You have to manually approve each follower request before they can see your protected tweets. Protected tweets can’t be retweeted, liked, or replied to by people who don’t follow you. They also can’t be indexed by search engines. Protected tweets are ideal for people who want to keep their tweets private and share them only with their close friends and family members.
Note: before deciding to switch to protected tweets, make sure you understand the implications and consequences of this decision.
2. What Happens After Switching ‘Protected’ to ‘Public’ on Twitter Setting?
When you switch the privacy settings on your Tweets from ‘protected’ to ‘public,’ all of your previously protected Tweets will become visible to anyone who uses Twitter. This means that people who are not following you will be able to search for and view your Tweets.
Additionally, your account will become more visible to people who are browsing Twitter.
3. What Are the Effects of Switching a Twitter Account to Private?
When you make your Twitter account private, you’re essentially creating a members-only club for your tweets. Only those who you approve to follow you will be able to see your content, and you’ll have to confirm all follower requests.
This means that your tweets won’t be visible to the general public, and only your approved followers will be able to retweet or reply to them. Additionally, your tweets won’t show up in Google searches, making it harder for strangers to find and interact with your content.
If you decide to switch to a private account, keep in mind that your Twitter profile will only display limited information, and your tweets from when your account was public will be hidden from view. However, the benefit of having greater control over who can access your content may outweigh these potential drawbacks.
4. I Made My Twitter Account Private, So Why Are They Still Showing up in Search Results?
When you protect your tweets on Twitter, only your followers will be able to read them and see them in Twitter search results. However, if your tweets have been shared or embedded on other websites or social media platforms, they may still show up in search results on those sites.
Unfortunately, Twitter does not have the ability to remove content from external websites, so there’s not much you can do to prevent your protected tweets from showing up in search results outside of Twitter. If you want to ensure your tweets are truly private, it’s best to avoid sharing them publicly in any form, even on other platforms.
Read more on Twitter: Explained: What Are Impressions on Twitter?
Conclusion: How to Make Twitter Account Private
Keeping your Twitter account private is an effective way to control who can see your tweets. With our comprehensive guide on “How to Make Twitter Account Private,” you can quickly and easily protect your privacy on the platform.
Remember to keep your account secure by using a strong password, enabling two-factor authentication, and being cautious about the information you share. Follow these tips, and you’ll enjoy a safer and more secure online experience.
For more information, see our blog posts:


