Page Contents
Have you ever noticed how lovely you appear in a phone photo but not so much in an Instagram post? It’s terrible! We constantly aim to post our finest photos, especially when posting a live picture on Instagram. However, the image’s quality drops sharply as soon as it is uploaded. As a result, knowing the precise information on the best export settings for Instagram in 2022 would be beneficial.
Instagram is the best photo-sharing app globally, and many people post their photos on the platform. However, it is essential to publish high-quality images and videos to stand out in the crowd. Therefore, if you desire to host IG photography contests or participate in one, you must know the best export settings for Instagram.
Now, let’s dive into the tips you need to learn to gain real Instagram followers and boost your outreach on the platform.
Best Export Settings for Instagram Photos
It is vital to pay attention to Instagram aesthetics to make your content stand out. Therefore, to avoid Instagram killing your photos after you’ve spent time refining them, study the best export settings for Instagram.
Image Dimensions
Instagram supports every ratio between 1.91:1 and 4:5. Therefore, the best export settings for Instagram to upload high quality photos are JPEG images with 1080px (width) by 1350px(height). Indeed, Instagram’s compression will resize anything wider than 1080px and higher than 1350px. Also, remember that Instagram will upscale pictures smaller than 320 pixels in width and 566 in height. So try to make your photo fit with Instagram standards. However, you can post vertical photos on Instagram without cropping using tricks. In the following, we’ll talk about having the best Lightroom and Photoshop export settings for Instagram. So buckle up!
Boost your Knowledge on Instagram:1000 free Instagram followers Trial
Best Lightroom Export Settings for Instagram
Lightroom is a cloud-based service that provides everything you require to design, edit, save, and share your photos using any device. Indeed, this app can arrange countless pictures. So by implementing the best Lightroom Instagram export settings, you’ll be organized and on top of your task.
Also, users who look for the best Photoshop export settings for Instagram can send an image from Lightroom to Photoshop on the iPad, back again, and transform their photos. Here are some beneficial tips to consider to have the best Lightroom and Photoshop export settings for Instagram:
- Firstly, sharpen your image for standard(medium) and a phone display.
- Square pictures (1080px x 1080px) are fine, but 4:5 images (1080px x 1350px) are the best.
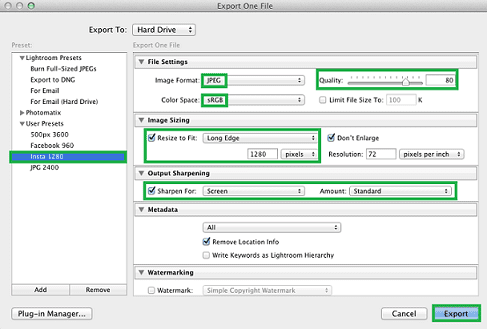
- Set the Lightroom’s Quality slider at 76%. Remember, it’s the same for the best Photoshop export settings for Instagram, too.
- Remember to edit and output the Color space of the photo in sRGB. This is the best export settings to ensure your image looks as consistent as possible on Instagram.
- To create sharper images for Instagram, you can exactly double the size of your photos. In this case, export square pictures (2160px x 2160px) or 4:5 images (2160px x 2700px).
- Keep the DPI/PPI as its default which is 72 pixels per inch. Since, in the digital world of photography, DPI/PPI doesn’t matter.
This is how you can have the best Lightroom and Photoshop export settings for Instagram:
Boost your Knowledge on Instagram: Instagram Followers App: 25 Safe & Free Apps to Get Followers
Best Video Export Settings for Instagram
If you are a video fan and post them on stories and IGTV, you need to upload high-quality videos on Instagram. So for the best video export settings for Instagram, follow the below suggestions:
Best Video Limit for Instagram
As you know, you can post long videos on the Instagram story, feed, & IGTV. So to optimize and get instant results, consider these details in your posts:
- Instagram Feed: 0 to 60 seconds.
- IGTV: 15 seconds to 60 minutes.
- Instagram Live: Max limit 60 minutes
- Instagram Stories: Max limit 15 seconds.
Keep Reading: Know and Beat Instagram’s Daily Limits
Best Aspect Ratio for Instagram
Firstly, let’s talk about the best export settings for Instagram videos aspect ratio, which is a dilemma for many users.
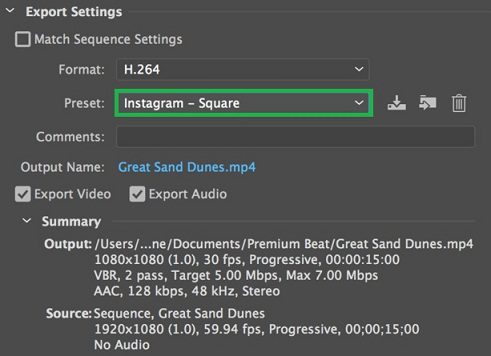
- Instagram Standard: 1080x1080px (1:1 aspect ratio).
- Instagram Landscape: 1920x1080px (horizontal 16:9 aspect ratio).
- Instagram Portrait: 1080x1350px (4:5 aspect ratio)
- IG Stories: 1080x1920px(vertical 16:9 aspect ratio).
Best Video Format for Instagram
Desire sharing YouTube video on Instagram? While making and shooting your video to avoid Instagram compression apply the following format and size in your settings:
The best format: MP4 H264 Codec
Audio: AAC
Ideal framerate: 30fps
File size: Less than 15Mb
Best Instagram Reels Export Settings on Premiere Pro
Instagram reels are a recent feature on Instagram that is growing in popularity. Therefore, to create engaging Instagram reels content, you must obtain precise information. Hereabouts, we gathered a list of Premiere Pro settings for Instagram reels that you can cash in to make the perfect reel.
- Create your new sequent: File>New>Sequence. Now, you will see many options to customize.
- Set the presets for the exact frame size of Instagram reels: 640(Horizontal)x1136(Vertical)
- The format: HDoC 264, match source, and high bit rate
- Choose the frame rate: 29.97.
- Click render at the maximum depth for Instagram reels quality settings
- Insert the bitrate settings: BBR2
- Press Ctrl+M to bring up the export dialogue
- Go to the export settings on Premiere Pro
- Save preset and call this Instagram Reels Export Premiere Pro Settings.
- Press OK and click export. This is the best Premiere pro-Instagram export setting.

The Best IGTV Export Settings Premiere Pro 2022
Since IGTV videos play in portrait mode, to perform Instagram export settings premiere pro for IGTVs, you need to set up your composition in portrait mode.
Now, to do IGTV export settings premiere, follow the steps below:
- Go to File > New > Sequence; or select ‘New Project’
- Flip the aspect 90-degrees to have your project in Portrait Mode( or (change the Aspect Ratio from 1920 x 1080 to 1080 x 1920.) Indeed, the maximum vertical aspect ratio is 9:16, while the most rectangular ratio you can use is 4:5.
- Next, you require to ‘Import’ your video. In this case, you can drag and drop your video into Premiere Pro. It may alert you to the fact that the composition does not match. But you don’t need to worry. This is the best export settings for Instagram Premiere pro.
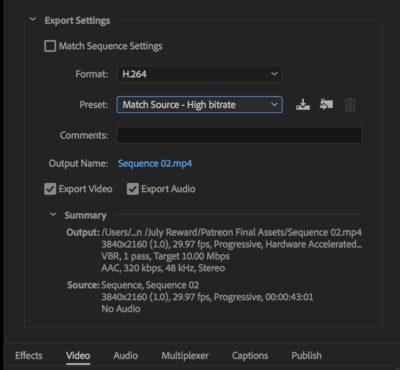
Now, it’s time to figure out how to make your footage look best in this new composition setup. Your task will be much easier if your videos are in portrait format. However, if you have a horizontal video, here are some ideas for you to try for IGTVexport settings:
Zoom In
If things in your video move in and out of frame, you may need to modify your position, but you can keyframe your position to follow the objects and maintain what you want central.
Rotate Your Video
By rotating your movie 90 degrees, you may make it horizontal. This will need your audiences to turn their phones 90 degrees to see it, which may be an acceptable alternative depending on your audience.
Shrink Your Video
Shrinking your video is another option to make it fit horizontally in the frame. Bring your aspect ratio down to 4:5 for this choice to maximize your viewers’ experience.
To do so, you need to go through the following steps:
- Go to Sequence > Sequence Settings.
- Now, to have the perfect 4:5 ratio change the setting to 1536 x 1920.
- Duplicate your footage and place one video directly on top of the other after it aligns with the horizontal width.
- You need to restore the bottom clip to 100% or whichever level covers the frame.
- Next, go to ‘Effects,’ select a ‘Gaussian Blur,’ and place it on your bottom clip.
- Finally, increase ‘Blur’ to whatever suits your taste, and make sure to check the box for repeat edge pixels.
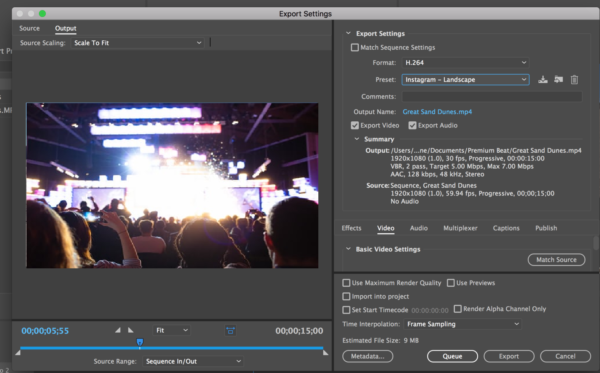
You perform all the above settings on the desktop. However, uploading your posts to Instagram, you must share them to your phone and then post on Instagram.
Whether you want to upload your Instagram videos utilizing a mobile, ensure you won’t corrupt your file’s quality when transforming it. To avoid this, you can use Google Drive or Apple Airdrop.
Long time-consuming process for freelance marketers with a hectic life! Unfortunately, the Instagram official app doesn’t allow users to post their feeds from the PC. Nevertheless, I will reveal a hack for you to upload your video to Instagram from your PC.
How to Upload Content from a PC without Losing the Original Resolution
AiSchedul is an Instagram management tool that allows you to upload any content without losing the original resolution from a pc. Also, this app provides you a feature to manage multiple Instagram accounts on PC and mobile.
AiSchedul lets you schedule, repost and download Instagram reels and videos, post them from a PC on multiple accounts simultaneously.
The good news is that this app has a feature called Instagram contest picker which lets you select the winner of your photo contests. On the other hand, by sending mass DMs to your followers you can invite them to join your photo contest.
To schedule and post your photos and videos on Instagram from desktop, you only need to:
- Sign up for free
- Add your Instagram account(s).
- Click on both the “POSTS & SCHEDULING” and “SCHEDULER” tabs.
- Select the “Schedule” button.
- Choose “feed,” “IGTV,” or “Story.”
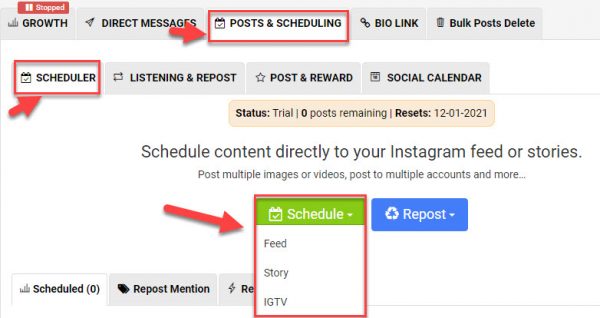
- Drag and drop your photo and video
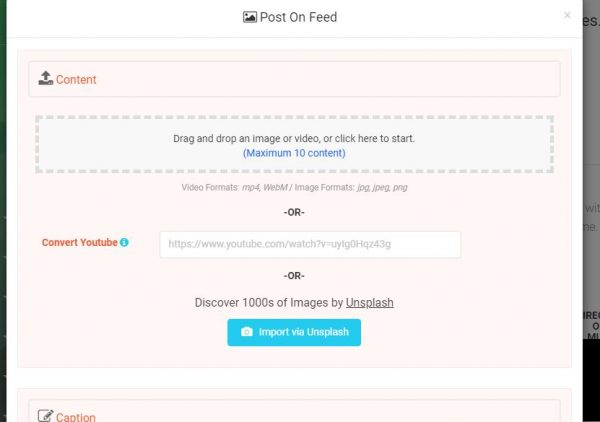
- Next, write a killing caption, and add a URL to your post if you wish.
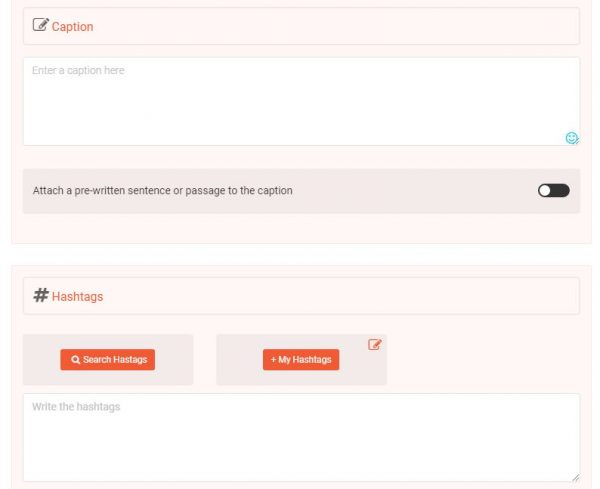
- Now, search, save and add multiple Hashtags.
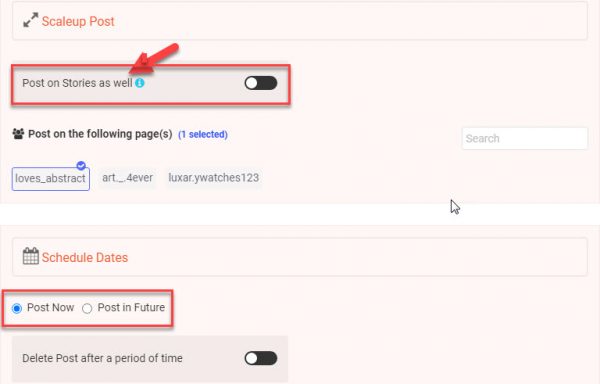
- Finally, if you are uploading your video on your feed, there is an option to “Post on stories as well.”
Final Thoughts
Uploading high-quality posts and applying the best export settings for Instagram will boost your engagement and drive followers to your account. However, it takes too much time to make a perfect post and transfer it from PC to your phone. Therefore, make most of the AiSchedul features to ease your task to reach your objectives of Instagram marketing ASAP.


